
Every Alocity AI agent watches a camera in one of three ways: inside an Area you draw, across a Line you draw, or across the Whole Frame with no drawing at all. This article explains where agents are configured and how to set up each type.
1. Where AI Agents Are Configured
- Click Settings (⚙ in the top bar) › AI Video Agent.
- Choose a category and click the agent's card.
- The camera grid opens. Use Search, the All Sites dropdown and the Configured / Unconfigured checkboxes to find the camera.
- Click an unconfigured camera to open the editor for that agent.
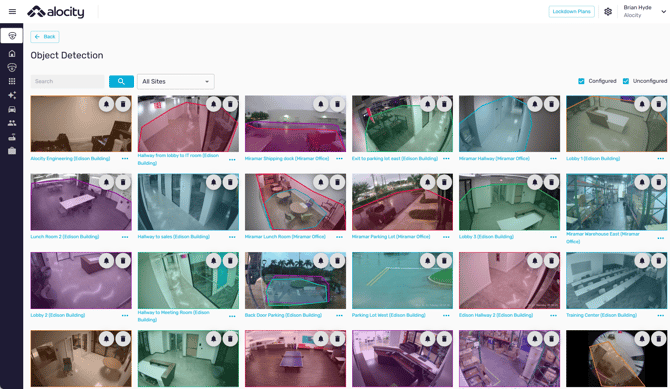
Configured cameras show their name in blue with three controls: 🔔 to set up an alert (see AI Alerts), 🗑 to remove the agent, and … for Edit, Delete, Alert and Advanced Settings.
Note: You can also open the zone editor from the camera itself: open the camera panel, select the AI Agents tab, choose the agent and click Edit Zones. The object detection region is on the camera page under Motion › ⚙.
| Type | How you set it up | Agents that use it |
|---|---|---|
| Area | Draw one or more zones on the image | Object Detection, Face Recognition, License Plate Recognition, Intrusion/Trespassing, Loitering, Queue Monitoring, Unattended Workstation, Dwell Time, Heatmaps, Vehicle Idle Time, Sidewalk Vehicle Detection, Fall Detection, Crowd Density Monitoring |
| Line | Draw one or more lines with a direction | People Counting, Vehicle Counting, Wrong Way Detection, Stop Sign Violation (two lines) |
| Whole Frame | Activate the camera; no drawing | Person of Interest, License Plate of Interest, Gun & Weapon Detection |
2. Area Agents: Draw the Region of Interest
The editor opens as Draw the Region of Interest. A new zone starts as a rectangle covering the whole image, named All Area. If you don't change it, the agent watches the entire frame.
- Drag the 8 control points (4 corners and 4 midpoints) to shape the zone around the area you want to watch. Zones don't have to be rectangles; you can skew them to follow a doorway, a fence line or a lane.
- Enter a Name for the zone, for example "Loading Dock".
- Set any options the agent shows for the zone, such as the object classes Person, Vehicle and Animals, a Time threshold, or a Max Count. The options depend on the agent.
- Click + to add another zone. Each zone has its own name, options and schedule.
- Click Save. Reset returns the zones to their starting state, and ✕ closes without saving.
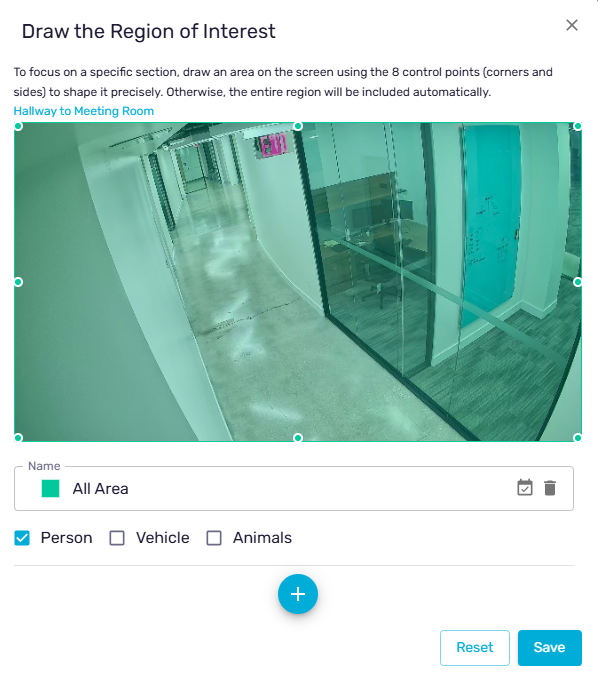
Note: New zones start with no object classes selected. On agents that use classes, check at least one before saving.
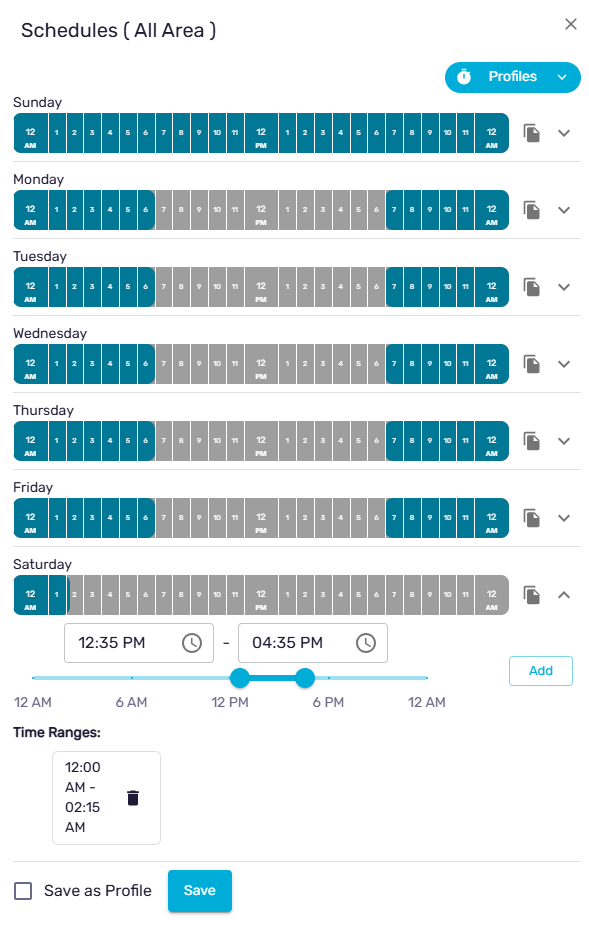
Schedules
Click Schedules next to a zone to choose when the agent is active.
- Each day from Sunday to Saturday has a 24-hour bar. Click ▾ on a day to set start and end times, then click Add. The day's Time Ranges list shows each period with a 🗑 to remove it.
- Click 📋 Apply schedule to other days to copy a day's schedule.
- To reuse a schedule, check Save as Profile. Saved profiles, such as Business Hours, appear under Profiles ▾.
- Click Save.
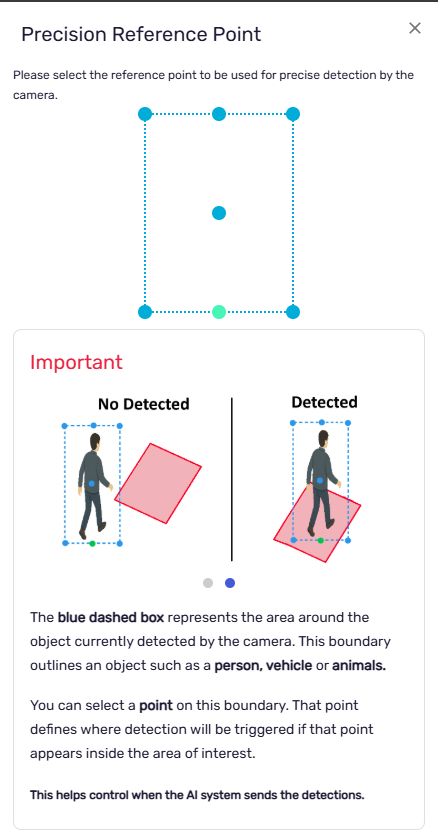
Advanced Settings: Precision Reference Point
By default an object triggers the agent when it enters the zone. Advanced Settings let you choose which part of the object has to enter, which reduces false alerts. For example, choose the bottom-center point so a person triggers an intrusion zone only when their feet enter it, not when their head overlaps it.
- In the camera grid, click … › Advanced Settings on a configured camera.
- In Precision Reference Point, click Select Point for the zone.
- Choose one of the 9 points on the box. The blue dashed box represents a detected object.
- Click Save.
3. Line Agents: Draw the Line of Interest
The editor opens as Draw the Line of Interest.
- Click +. The prompt Draw the line of interest you want to observe appears.
- Click and drag across the image to draw the line. Draw it where every person or vehicle must cross, such as a doorway threshold or a lane.
- The line shows IN and OUT on either side. Click the ⇅ button in the middle of the line to swap the direction.
- Enter a Name for the line (default Line 1), set its 📅 schedule, and optionally choose a Groups entry.
- Click Save. Save stays disabled until at least one line is drawn.
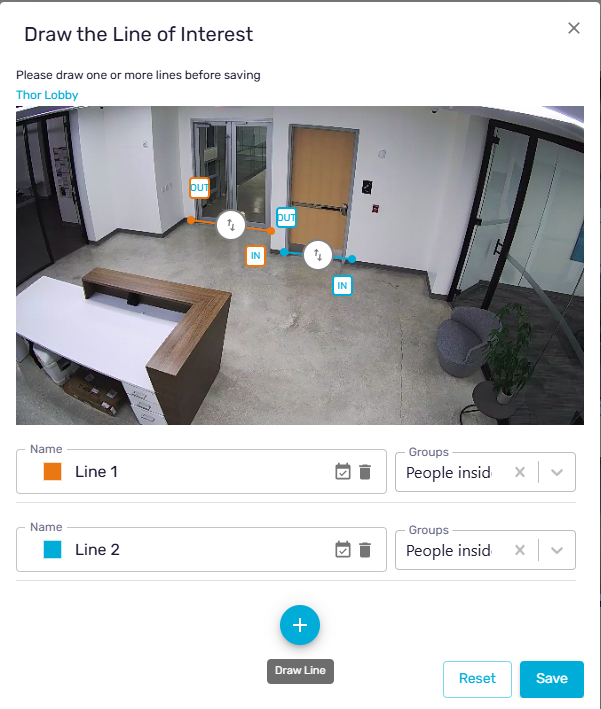
Tip: Draw counting lines at a right angle to the direction of travel, and away from the edges of the image where people and vehicles are only partly visible.
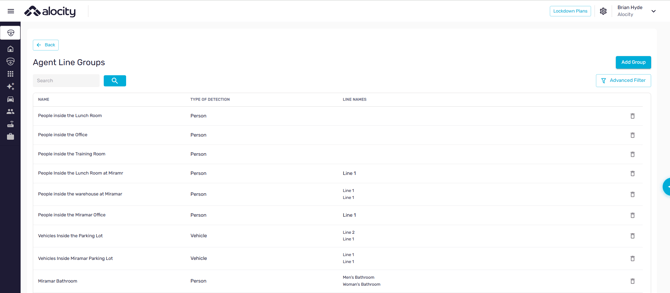
Agent Line Groups
Line groups combine several lines so they count as one unit, for example every entrance to a store. To create one, go to Settings › Agent Line Groups, click Add Group, choose the Type of Detection (Person or Vehicle) and select the lines. Then pick the group in each line's Groups dropdown.
4. Whole Frame Agents: Activate the Camera
Whole Frame agents analyze everything the camera sees, so there is nothing to draw.
- Click the camera in the agent's camera grid.
- Read the activation message, for example Camera Activation for POI Detection.
- Click Activate, or Cancel to go back.
- You will see a bell and trash can hovering over the stream when completed.
5. Tips for Reliable Zones
- Finalize the camera's angle, zoom and focus before drawing zones. Moving the camera later means redrawing them.
- PTZ cameras: return to a home preset so the zones line up with the image.
- Keep zones off busy areas you don't care about, such as a street behind a fence, to avoid unwanted alerts.
- Check the camera's settings first. Smart codecs and Dynamic FPS reduce AI accuracy. See Best Camera Configurations for AiVR.
For questions or assistance, please contact your account manager or email support@alocity.com.