
The Video Wall lets operators watch many live cameras at once, in a layout built for the job: a front desk, a guard station or a security operations center. Walls are saved, show AI events as they happen, and can be sent to separate monitors.
Open the Video Wall
In the Video Security module, select Video Wall from the left menu. The top of the page shows:
- Wall status: how many cameras are live and offline, and ALL CLEAR when there are no active events.
- Wall tabs: every saved wall with its camera count. Click a tab to open that wall.
- Layout buttons: 2×2, 3×2, 3×3, 4×3, 4×4 or Spotlight.
- Full screen and + New wall.
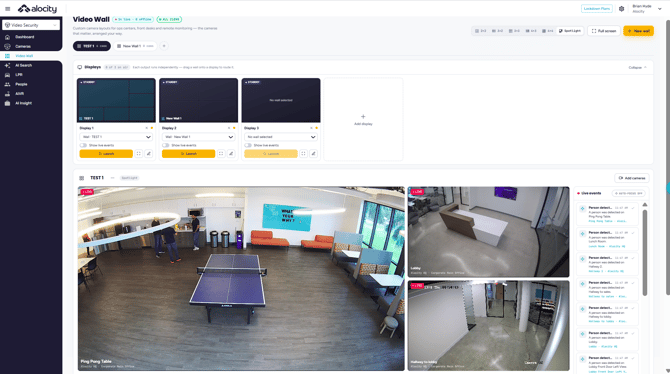
- Wall status: Live and offline cameras and the alert state.
- Wall tabs: Switch walls; + creates another.
- Layouts: 2×2, 3×2, 3×3, 4×3, 4×4 or Spotlight.
- Full screen and New wall.
- Displays: Each output shows one wall. Pick the wall, then Launch.
- Add display: Add another monitor output.
- Camera tiles: Live video for every camera on the wall.
- Add cameras: Put more cameras on this wall.
- Live events: AI detections from the cameras on the wall.
Create a wall
- Click + New wall, or + next to the wall tabs. A new, empty wall opens straight away with a 2×2 layout.
- Click the wall's name above the tiles to rename it for its purpose or place, for example "Lobby Desk" or "Loading Docks".
- Choose a layout: a grid such as 3×3 to watch cameras equally, or Spotlight to give one camera a large tile.
- Click Add cameras. In Camera sources, search or pick a site, then click a camera to add it, or drag it onto a tile.
Every change is saved as you make it. To delete a wall, open ⋯ next to its name and choose Delete wall. This removes the wall only, not the cameras.
Spotlight layout
Spotlight shows one main camera in a large tile, with the other cameras in smaller tiles beside it. Every tile shows a LIVE badge, the camera name and its site. Use it when one view matters most, such as a main entrance, and the others are there for context.
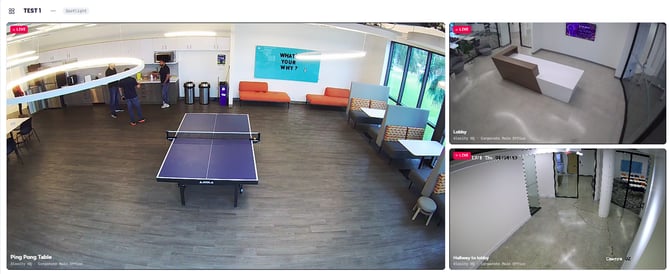
- Wall name and menu: The tag shows the layout in use.
- Spotlight tile: The main camera, shown large.
- LIVE badge: The tile is showing live video.
- Side tiles: The other cameras on the wall.
- Camera and site.
Live events and auto-focus
The Live events panel on the right lists AI detections from the cameras on the wall, newest first: the detection, the time, a short description, and the camera and site. Click an event to focus that camera on the wall.
Auto-focus decides whether the wall reacts on its own. When it's on, critical alerts take over the wall automatically, so nobody misses them. When it's off (AUTO-FOCUS OFF), the layout stays where you put it.
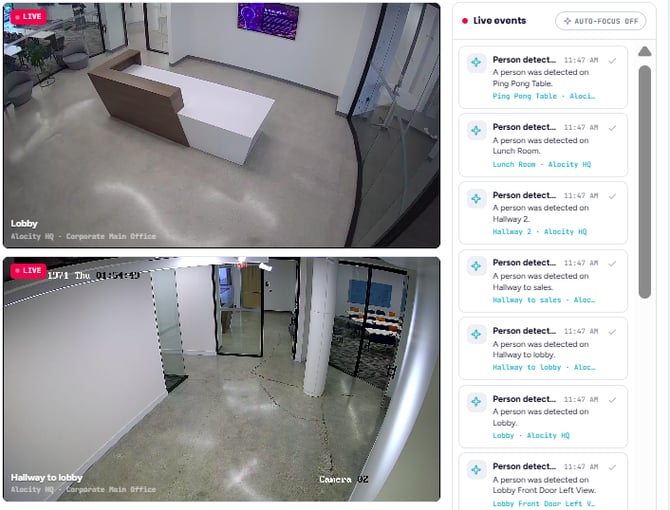
- Camera tile: Live video on the wall.
- Live events: AI detections as they happen.
- Auto-focus: Brings the camera with the newest event forward when on.
- Event card: What was detected, when, on which camera and site.
Tip: Turn on auto-focus for a lightly staffed desk that also answers phones. Leave it off in an operations center where operators arrange their own views.
Investigate from the wall
Hover over a tile to see its controls: Move (drag the tile somewhere else), Playback, Remove and Investigate. You can also drag a camera from Add cameras straight onto an empty tile.
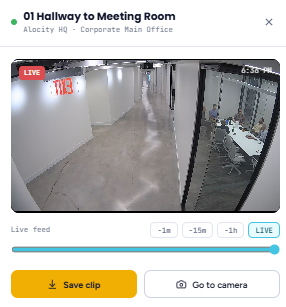
Investigate and Playback open a panel beside the wall without leaving it:
- Jump back -1m, -15m or -1h, or drag the slider. The picture shows PLAYBACK and how far back you are. Click LIVE to return.
- Save clip saves the video you're reviewing.
- Go to camera opens the camera's full page with Motion and History.
Click any event in Live events to focus that camera on the wall. The layout badge changes to AI focus while it's shown.
Send walls to monitors with Displays
To watch more cameras than one wall holds, or to run walls on several screens, use Displays instead of extra browser tabs. Each display shows one wall and runs on its own. The header shows how many are on air.

- Displays: How many outputs are on air.
- Preview: What the display is showing and its state.
- Wall: Pick the wall this display shows.
- Show live events: Adds the live events panel to the output.
- Launch, full screen and edit.
- Add display.
- Click Add display.
- On the display card, choose a wall from the dropdown, or drag a wall onto the display.
- Turn on Show live events to include the Live events panel, or leave it off for video only.
- Click Launch. A display that isn't launched shows STANDBY. Use the full-screen icon to open it full screen, the pencil to edit it, and × to remove it.
Best practices
- Make a wall for each high-priority zone, such as entrances, loading docks or parking.
- Use Spotlight for the one view that matters most at that desk.
- Use Displays for multi-monitor stations, so each screen keeps its own wall.
- Turn on auto-focus where staff can't watch every tile all the time.
- Pair the wall with AI Alerts so events reach people away from the screen.