
Once your Mercury controller is installed and connected to the network, add it to your account in the Alocity Control Center.
Onboarding order: add the controller by MAC address → confirm it's online → add sub-panels → configure readers, inputs and outputs → create doors.
1. Add an Alocity-Ready Controller
Controllers that Alocity has already flashed and certified can be added directly by MAC address.
- Log in to control.alocity.com with your administrator account.
- If not account is made please refer to: Creating an account
- If you manage more than one account, switch to the correct one from the account menu at the top right.
- Open the Access Control module and select Hardware.
- Select the ACUs tab and click + Add ACU.
- Choose the Site where the controller is installed.
- Enter the controller's MAC Address, from the label on the board.
- Click Add.
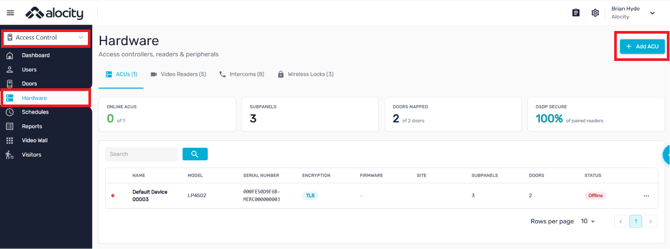
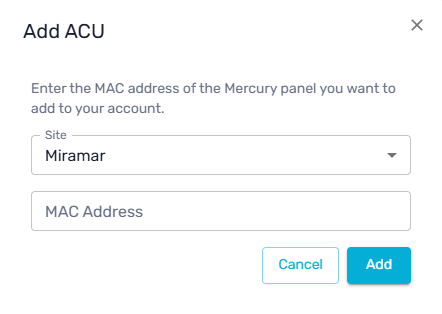
When the controller connects, Alocity sets it up automatically: it syncs the panel clock and sizes the panel's database for your cardholders, card formats and elevators. There's no manual sync or sizing step.
2. Take Over an Existing Mercury Controller
Coming soon. Alocity will take over existing Mercury controllers, flash them and add them to your account in one process. This section will be updated when it's available. Until then, contact Alocity support to bring an existing controller into Alocity.
3. Confirm the Controller Is Online
The controller appears on the ACUs tab. When it connects, its STATUS changes from Offline to Online, and the ONLINE ACUS card counts it.
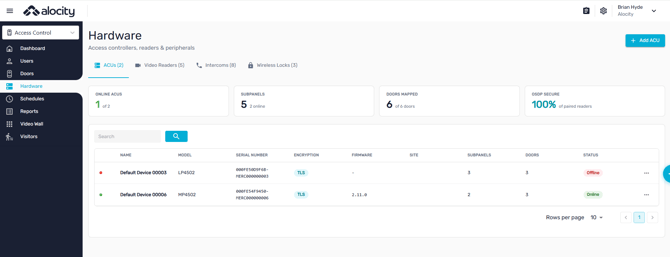
The list shows each controller's MODEL, SERIAL NUMBER, ENCRYPTION (TLS), FIRMWARE, SITE, SUBPANELS and DOORS. The row … menu offers Resync, Download wiring diagram and Delete.
To resend schedules and holidays later, use Sync Schedules and Sync Holidays on the controller's Firmware tab. See Mercury Controller Details.
4. Next Steps
- Adding Sub-Panels: add the controller's RS-485 modules.
- Configuring Readers, Configuring Inputs and Configuring Relay Outputs and Locks: program each port.
- Creating and Managing Mercury Doors: create doors and test them.
For questions or assistance, please contact your account manager or email support@alocity.com.